Posts

Enabling Internet in Android Emulator

Image
 This experiment is run on a Mac Laptop. For Windows, the file path may be different but the commands should be essentially the same. 1. cd to the location: `~/Library/Android/sdk/emulator` Now view the list of available emulators with: ` ./emulator -list-avds` Say you want to enable internet in the first device Nexus_5_API_30,  make sure the emulator isn't running(it's closed), then run the following command: ` ./emulator -avd Nexus_5_API_30 -dns-server 8.8.8.8 -read-only` Now the emulator starts and you can browse internet in it.  Most importantly you can now sign in to Google Play store and perform various operations, like in my case I needed to pair a phone emulator to a watch emulator which needed Wear OS app to be installed on the phone and that needed Google Play Store login. Let me know if this works for you or not.
View Binding in Activity and RecyclerView

Image
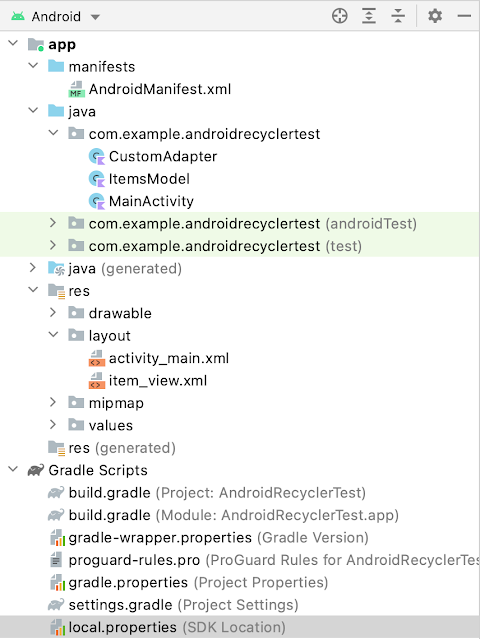
 You can read what's view binding from the official documentation. I am presenting a TL;DR of how to do it in an Activity and RecyclerView.  This is more of a reference document than a tutorial. This is how the project structure looks like: In the app level build.gradle file inside the android block add the following: buildFeatures { viewBinding = true } And then gradle sync your project. Let me know if you have any comments, question or concerns. Sulav

Capturing Screen of Android Device using ADB

 Make sure the android device is connected. adb devices Run the following command and start performing actions on your emulator or physical device. adb shell screenrecord /sdcard/example.mp4  Once you are done, press [Ctrl] + [C] to stop the recording. Pull the video from the device to your computer using: adb pull /sdcard/example.mp4 If you want to convert the mp4 to gif, run this command: ffmpeg -i example.mp4 example.gif

ADB Cheat Sheet

Lists all settings adb shell settings list global enables "show taps" on the UI adb shell settings put system show_touches 1 set the battery state as unplugged adb shell dumpsys battery unplug To set the battery percentage adb shell dumpsys battery set level 65 http://mikepalarz.me/2019/04/dumpsys-battery set the battery state as what is original(not so sure about this, you can try it out) adb shell dumpsys battery reset Return 1 if device is in battery saver mode, else returns 0 adb shell settings get global battery_saver_mode To show list of activities in backstack. I have discovered this command with lot of research. adb shell settings put global zen_mode 1 adb shell "pidof com.google.android.wearable.sysui | xargs kill" adb shell dumpsys activity activities| grep "* Hist" Command for accessibility https://gist.github.com/mrk-han/67a98616e43f86f8482c5ee6dd3faabe Enable wifi adb shell svc wifi enable This is not working.Haven't found a right solutio...

Debugging Android app with ADB command

Image
1. First find the emulators that are active. adb devices 2. You can specify the device ID or serial number to start debugging in a particular emulator/device, but I am considering you have only one emulator. Close other emulators or disconnect other devices if you have any extra. 3. Find the packages installed on the emulator so you can get the package name: adb shell pm list packages Use grep command to find the exact package name. 4. Set the app to debug at startup: adb shell am set-debug-app -w com.sulav.carowner Start the app on the emulator by clicking on the launcher icon. You will get a popup saying it's waiting for a debugger to be attached. In the Android studio, go to Run -> Attach Debugger to Android Process and select the particular process. Now if you have kept breakpoint on the code, it will stop at that point.

ADB over Wi-Fi

Image
  To debug the behavior of your application while an accessory is plugged in, you can't use ADB through a USB cable. In this case, to debug applications, you need to link your device to ADB over Wi-Fi. Steps to configure the ADB connection over Wi-Fi Connect the device and the computer to the same Wi-Fi network. If the computer is connected to VPN, disconnect from it. The device can be on VPN. Plug the device into the computer with a USB cable to configure the connection On the computer command line type:  adb tcpip 5555 On the computer command line type:  adb shell ip addr show wlan0  and copy the IP address after the "inet" until the "/". You can also go inside the Settings of the device to retrieve the IP address in Settings → About → Status. On the computer command line type:  adb connect ip-address-of-device:5555 You can disconnect the USB cable from the device and check with  adb devices  that the device is still detected. adb over wifi

Setting up Graphql Server

This tutorial is based on https://www.apollographql.com/docs/apollo-server/getting-started/  Install node and npm. If you don't have them installed do the following 1 and 2:     1. Install homebrew from  https://brew.sh/     2. Install node and npm using homebrew Create a new folder named graphql-server-example cd into it. setup node project using the command: npm init --yes This creates a package.json file. Install apollo-server and graphql   using: npm install apollo-server graphql Create an empty index.js file with command touch index.js Add the following content to the file: const { ApolloServer , gql } = require ( 'apollo-server' ); // A schema is a collection of type definitions (hence "typeDefs") // that together define the "shape" of queries that are executed against // your data. const typeDefs = gql ` # Comments in GraphQL strings (such as this one) start with the hash (#) symbol. # This "Book" type defines the queryable field...