Posts

Showing posts from November, 2019

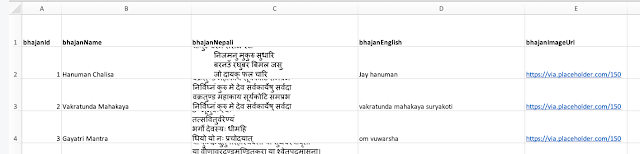
Retrofit 2 : REST Client for Android

Image
Using RxJava with Retrofit Add the following dependencies in Module level  build.gradle file: dependencies { /// ... // Add Retrofit implementation 'com.squareup.retrofit2:retrofit:2.5.0' // Using gson as converter implementation 'com.squareup.retrofit2:converter-gson:2.5.0' // A Converter which supports converting strings and both primitives and their boxed types to text/plain bodies. implementation 'com.squareup.retrofit2:converter-scalars:2.5.0' implementation 'io.reactivex.rxjava2:rxandroid:2.1.1' // Because RxAndroid releases are few and far between, it is recommended you also // explicitly depend on RxJava's latest version for bug fixes and new features. // (see https://github.com/ReactiveX/RxJava/releases for latest 2.x.x version) implementation 'io.reactivex.rxjava2:rxjava:2.2.8' implementation 'com.squareup.retrofit2:adapter-rxjava2:2.5.0' implementation 'com.squareup

Important GIT Techniques

To find the names of all files that were changed (deleted, modified or added) in a given commit git diff-tree --no-commit-id --name-only -r bd61ad98 To save those files' names to output.txt git diff-tree --no-commit-id --name-only -r bd61ad98 > output.tx ========================== Using diff2html-cli for generating preety diff between two commits: Install diff2html-cli: Install node first, In command line brew install node Then install diff2html-cli, in command line type: npm install -g diff2html-cli Run the command to find the diff.html file: git diff 8f8428f0d da63cef6c | diff2html -i stdin ============================= Scenario: You have cloned a project from github, you were working locally on it, changed the projects and commited to new local branch(Eg PostMethod). Now you want to also create a remote branch by same name(PostMethod) and push the local changes to that branch. git branch --set-upstream-to PostMethod origin/PostMethod Branch 'origin/PostMethod' set up

Cloning a Github Project

Image
If you are planning to work on IT, having knowledge about Git is immensely important for tracking changes in computer files or coordinating work on those files among multiple people. If you have never heard about git before this, trust me, you must go through this article. After you have installed Git and created an account on Github already (if not follow this article ), go to the Github repository you want to clone to your local machine. Say you want to clone and work on the following repository: https://github.com/sulavtimsina/phpMVC Click on Clone or Download. Click on "Use SSH" and copy the URL to clipboard. Go to the folder where you want to clone (download) this repository, right click on the white space and select Git Bash Here to open up the git bash on this location. On the git bash type: git clone git@github.com:sulavtimsina/phpMVC.git If you haven't already added the SSH public key to your Github profile, then you may get this error: Follow this link or watch

Install Git on Windows

Image
Go to the URL:  https://git-scm.com/downloads Click on the " Download 2.16.1 for Windows " or whichever is the latest version that's written there. Run the downloaded installer file. When you arrive in this window, chose either the first or second option. If you chose the first option, you will have to run the Git commands from a different terminal not from the command prompt (cmd.exe) later on. Everything else is default. Complete the installation. Now go to https://www.github.com and sign up. Now you will be able to create and clone git projects. Watch the following video tutorial for these above steps.

Import Excel Data into Firebase Database

Image
I had a table of data that I wanted to feed into Firebase Realtime Database which has to be in JSON format. The table looks like this: Make sure that the key names for the JSON file should be the top row of the table. Now save the file as .csv in Excel: Go the  https://codebeautify.org/csv-to-xml-json  and browse the csv file and click on "CSV to JSON" button and then on "Download". In Firebase realtime database, click on the 3 dots icon on the right as shown in the image below: Then click on "Import JSON" as shown below: Then browse the downloaded JSON file and click on "Import". You will get the result as shown below:

To install Debug and Release build on a device

Image
On the module level build.gradle file, add the following section: If you have google-services.json file in the app/ directory then create debug and release folders inside app/src as shown below and cut the google-services.json file from the previous location and paste to both the debug and release folder as shown below. Now go to the json file of the debug folder and add .debug to the end of the value of package_name, i.e if originally it was: "package_name": "com.sulav.myapp" change it to "package_name": "com.sulav.myapp.debug" There should be two occurrences of this key, you may have to replace at 2 places. Run the debug built of the app on the device which already has release version of the app, it should work like a charm.